

Welcome to The Gilded Registry
Congratulations on your engagement! The Gilded Registry is a complete wedding planning tool that runs entirely in your web browser. There are no logins to remember, no monthly fees, and no one else can see your plans unless you choose to share them.
Everything you need is inside one file: The_Gilded_Registry.html. Simply open it in your web browser (Chrome, Firefox, Safari, or Edge) and you're ready to begin.
What Can You Plan?
The app includes eleven dedicated planning tools, all accessible from the sidebar menu:
Why Is It Private?
Your guest list, budget, and personal details never leave your computer. No company, advertiser, or third party ever sees your wedding plans.
Because there are no accounts, there are no passwords to remember, hack, or reset. One less thing to think about during wedding planning!
Everything runs on your computer. The app opens in a snap, works without an internet connection, and never makes you wait for a server.
No monthly fees, no hidden charges, no features locked behind a paywall. You bought it, you own it, forever.
Getting Started
Setting up takes less than five minutes. Follow these steps and you'll be ready to plan your dream wedding:
Your Dashboard
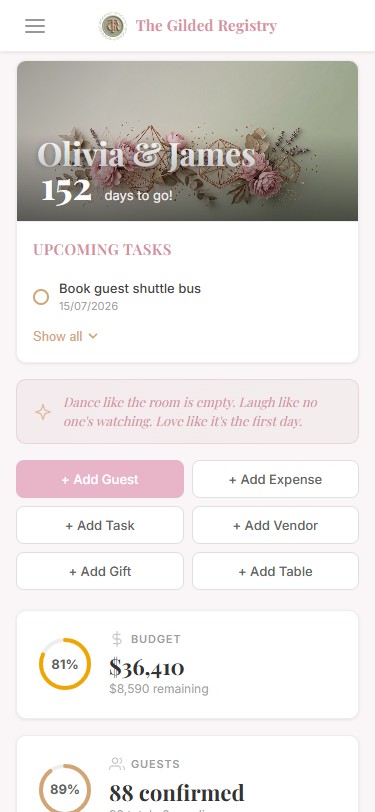
The Dashboard is your home page. It gives you a quick overview of everything: your upcoming tasks, budget status, guest RSVP progress, seating plan, vendors, and gift tracking — all in one place. The sidebar shows your couple names along with a live countdown to your wedding day (e.g. "152 days to go!"), and the hero banner at the top prominently displays your names.
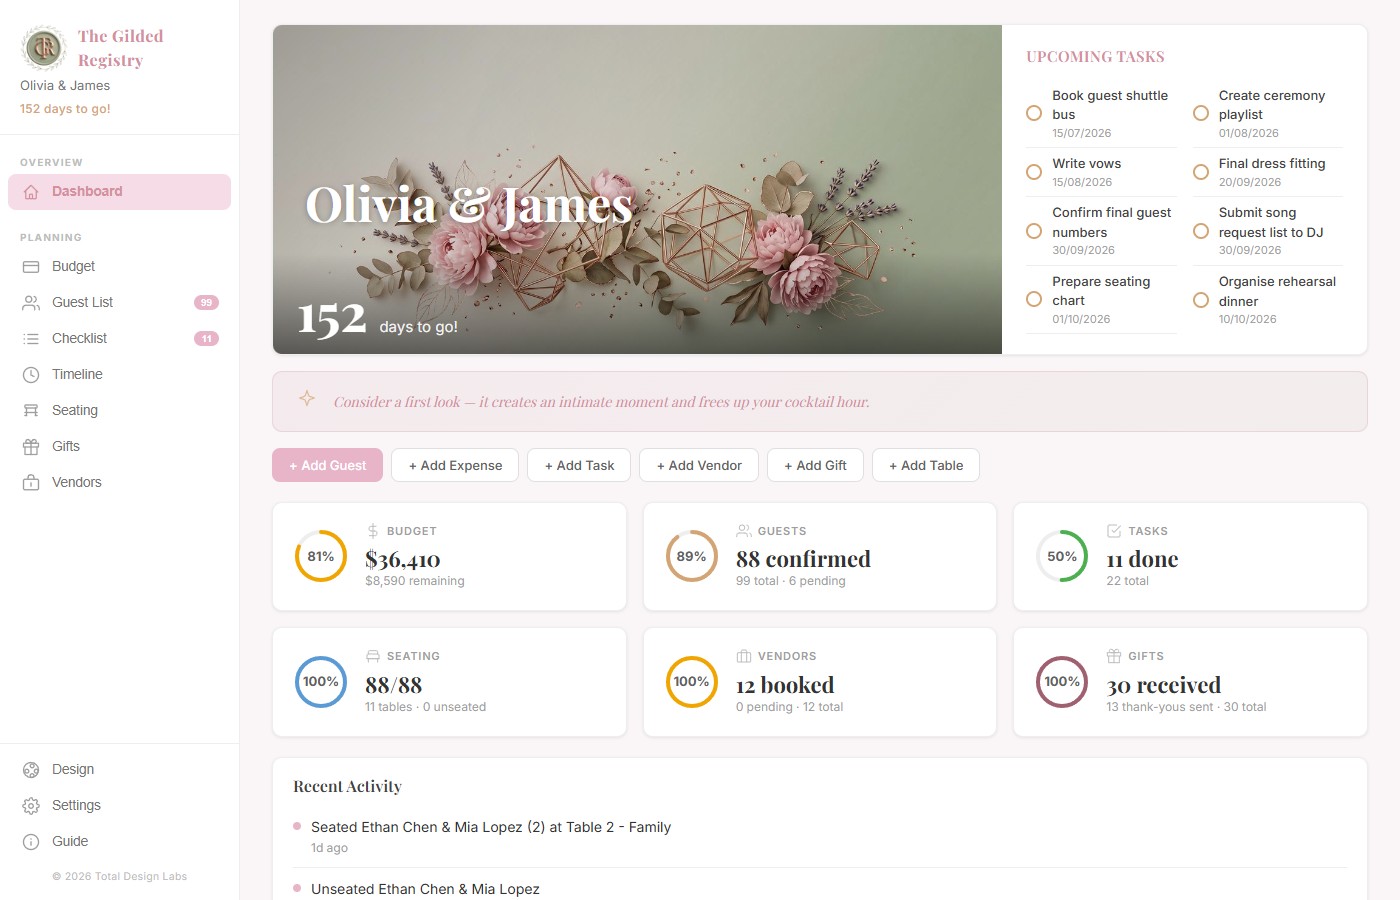
From the Dashboard you can quickly add guests, expenses, tasks, vendors, gifts, or tables using the quick-add buttons. The summary cards show your real-time progress across every planning area. A Tips & Inspiration section at the bottom provides helpful wedding planning quotes and suggestions.
Your Planning Tools
Each tool is a dedicated page designed around a specific part of your wedding planning. Click any item in the sidebar menu to switch between them.
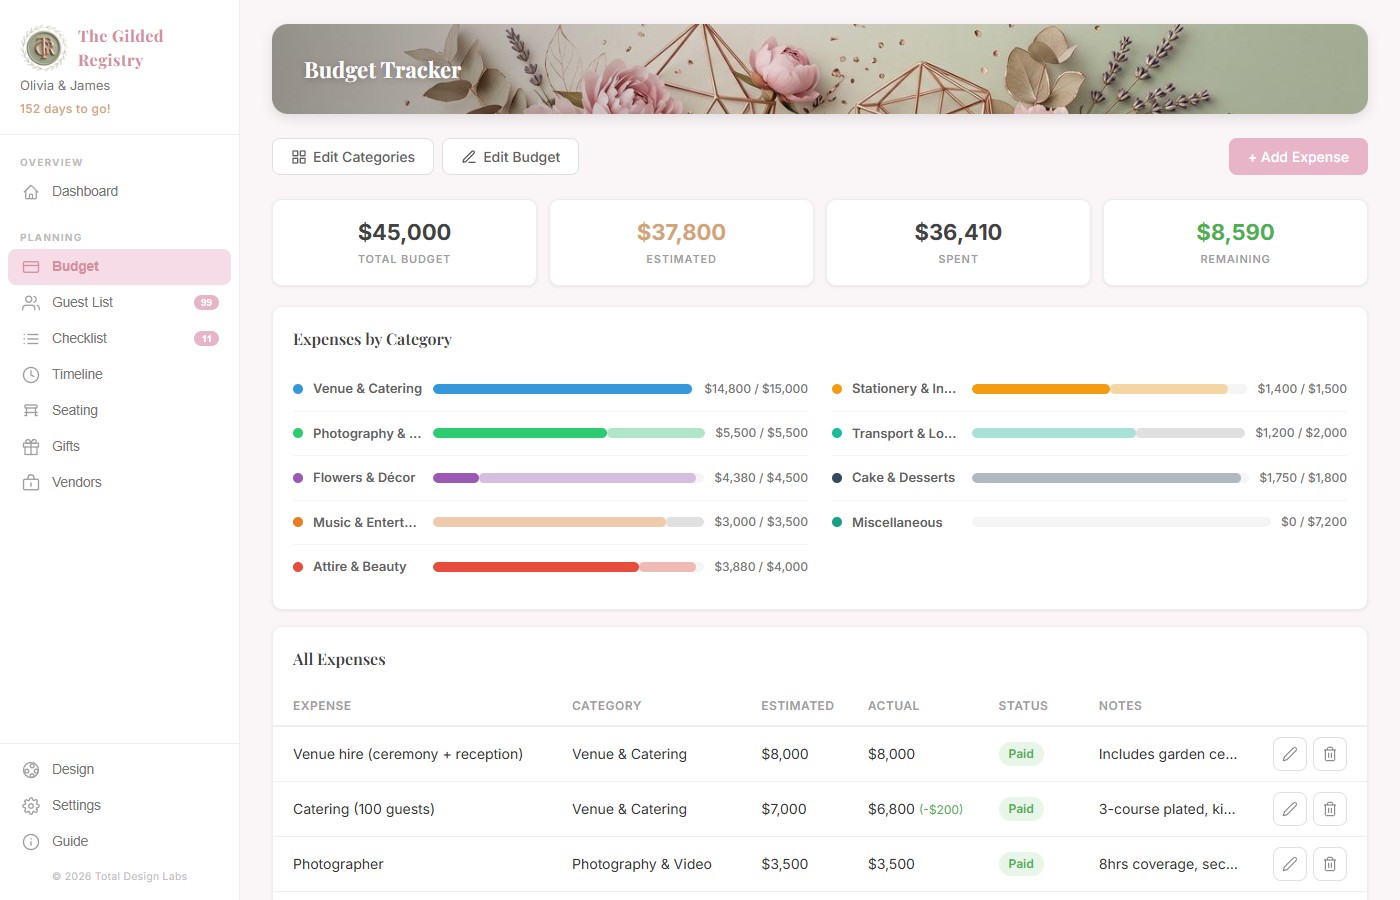
Budget Tracker
Keep track of every penny. Set your total budget, create spending categories (like Venue, Catering, Flowers), and log individual expenses with an Expense Name, estimated amount, and actual amount. The overview at the top shows your total budget, what you've estimated, what you've spent, and what's remaining.
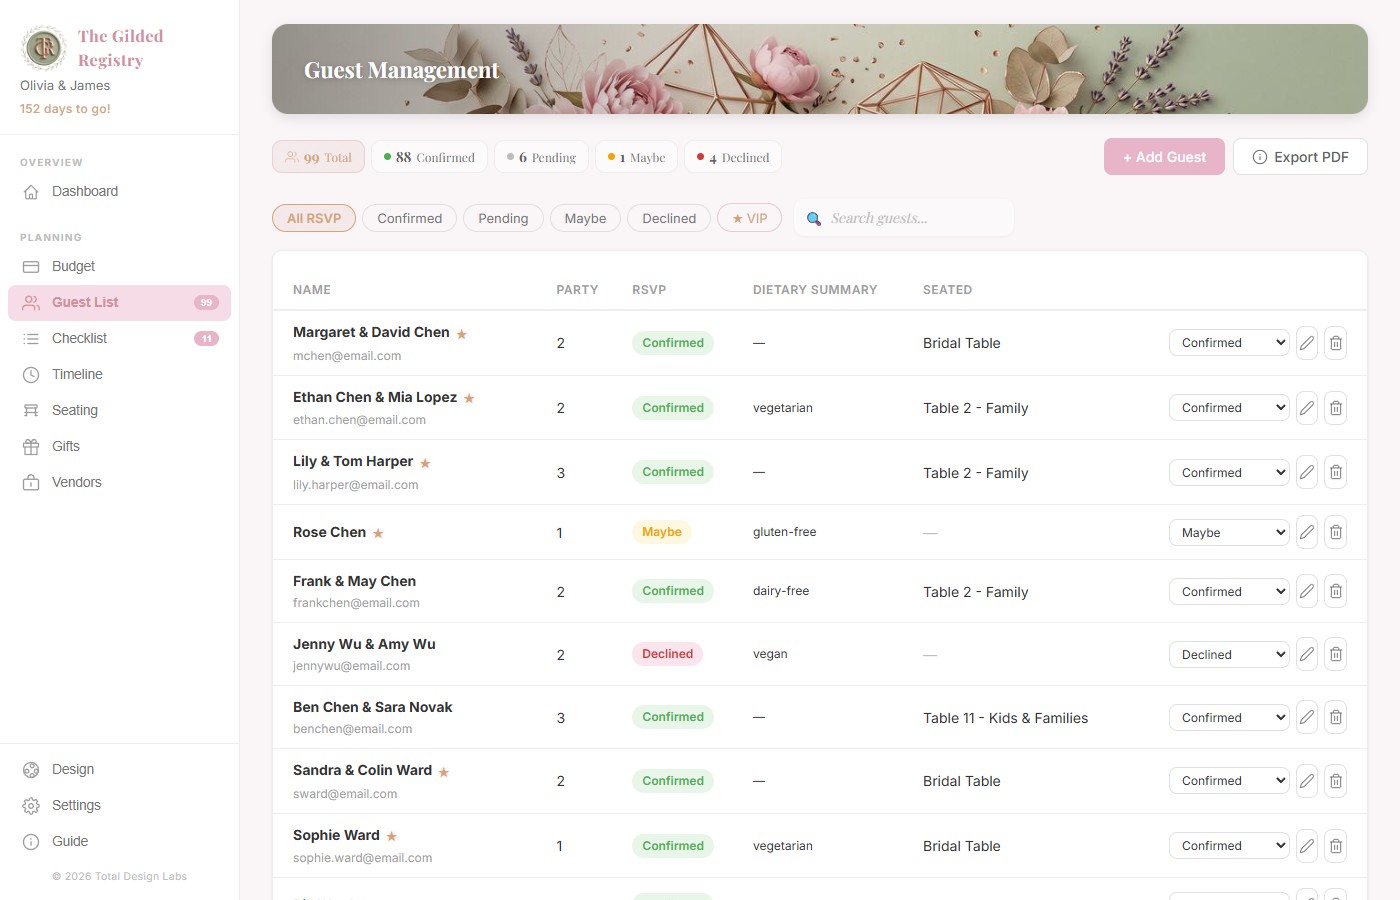
Guest Management
Add your guests, track their RSVPs, record dietary requirements, and mark VIPs. You can filter by status (Confirmed, Pending, Maybe, Declined) and search for any guest by name. When you're ready, export a PDF of your complete guest list.
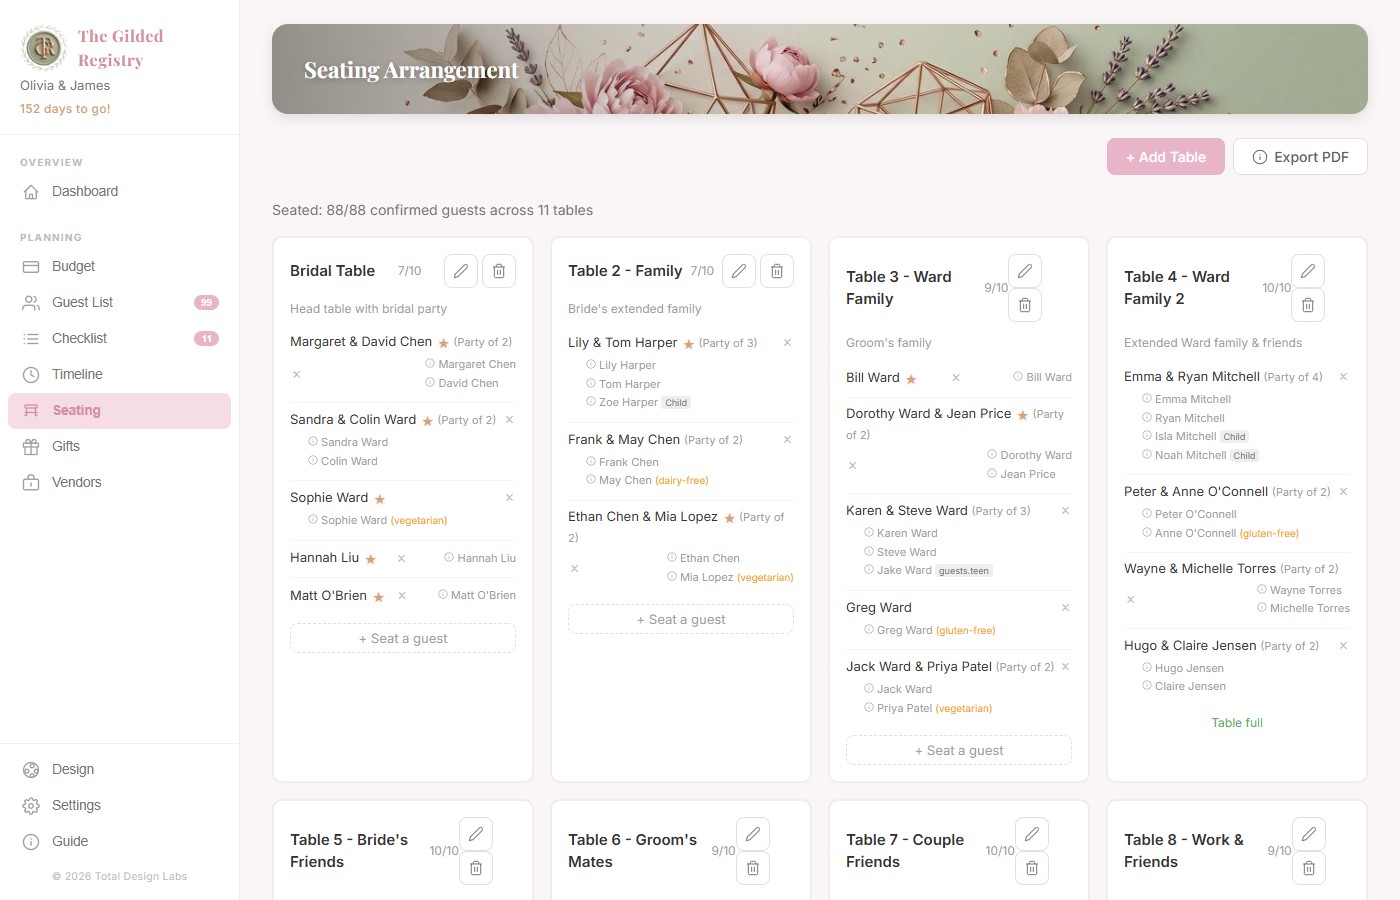
Seating Arrangement
Create tables, set the number of seats per table, and assign your confirmed guests. The seating tool keeps track of how many seats are filled at each table so you can balance your layout perfectly.
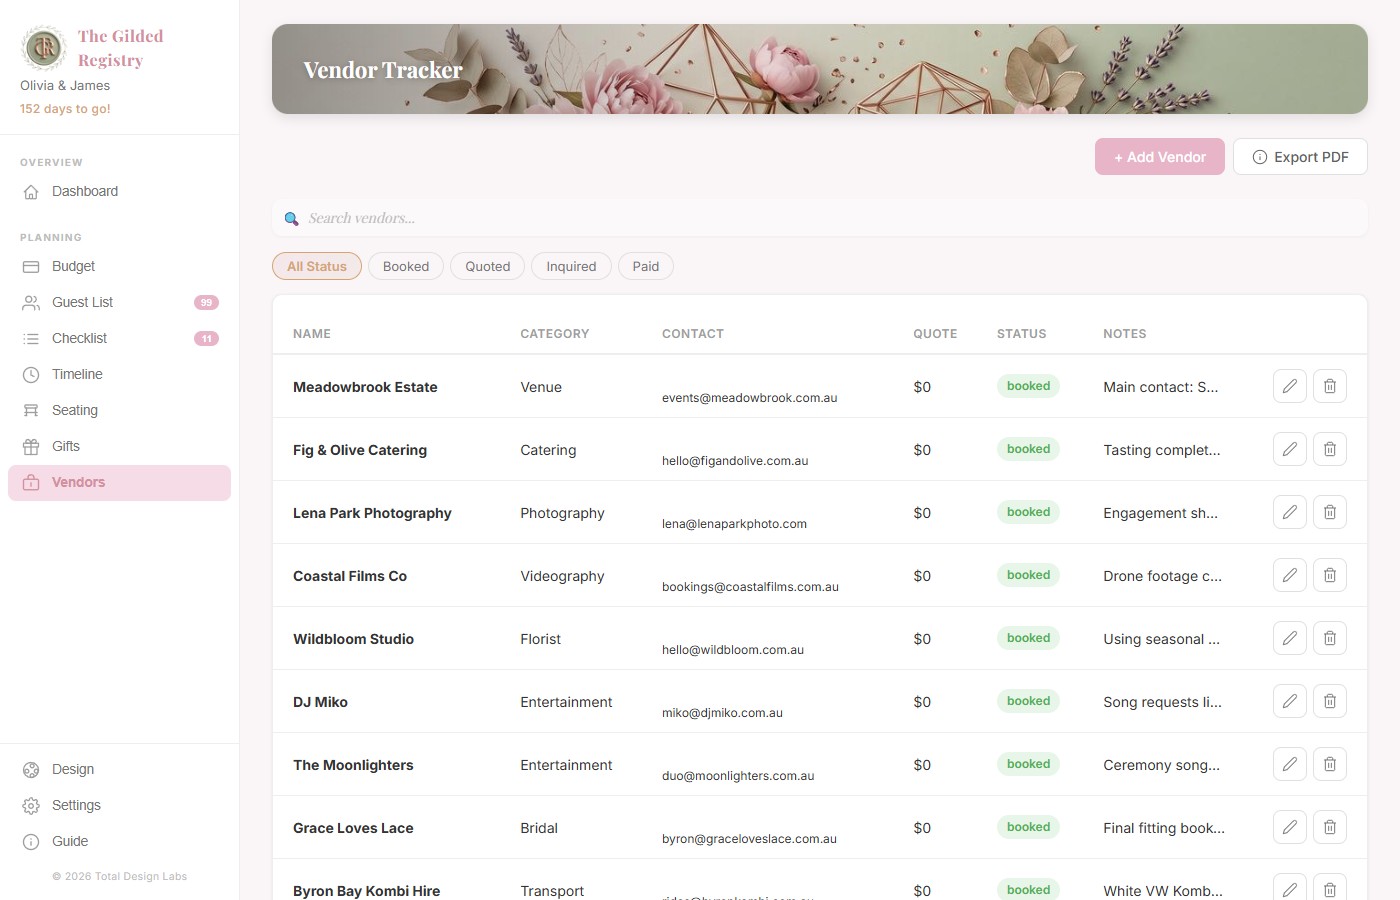
Vendor Tracker
Keep all of your wedding professionals in one place. For each vendor — venue, caterer, photographer, florist, DJ, and more — you can store their contact details, overall quote, deposit paid, and remaining balance. Set each vendor's status to Searching while you're still comparing options, or Booked once you've confirmed them. The Dashboard summary card shows your overall vendor progress at a glance.
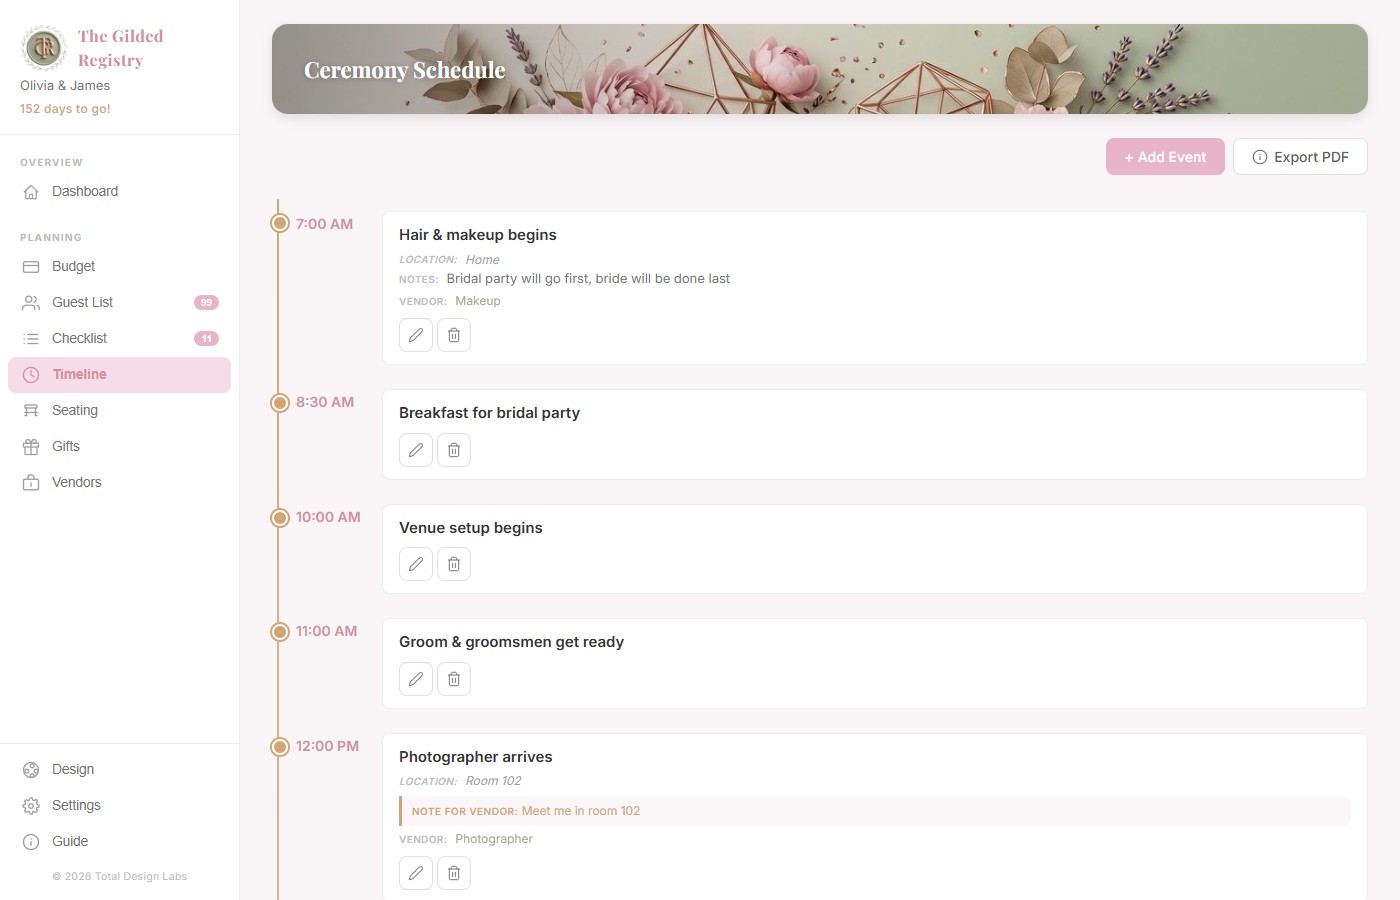
Master Timeline (Day-of Run Sheet)
Build a chronological schedule for your wedding day itself. Add each milestone — ceremony start, photos, cocktail hour, reception entrance, speeches, first dance, cake cutting — with a specific time. The Timeline displays your events in order so everyone involved knows exactly when things happen. All times must be entered as valid time values (e.g. 2:30 PM or 14:30).
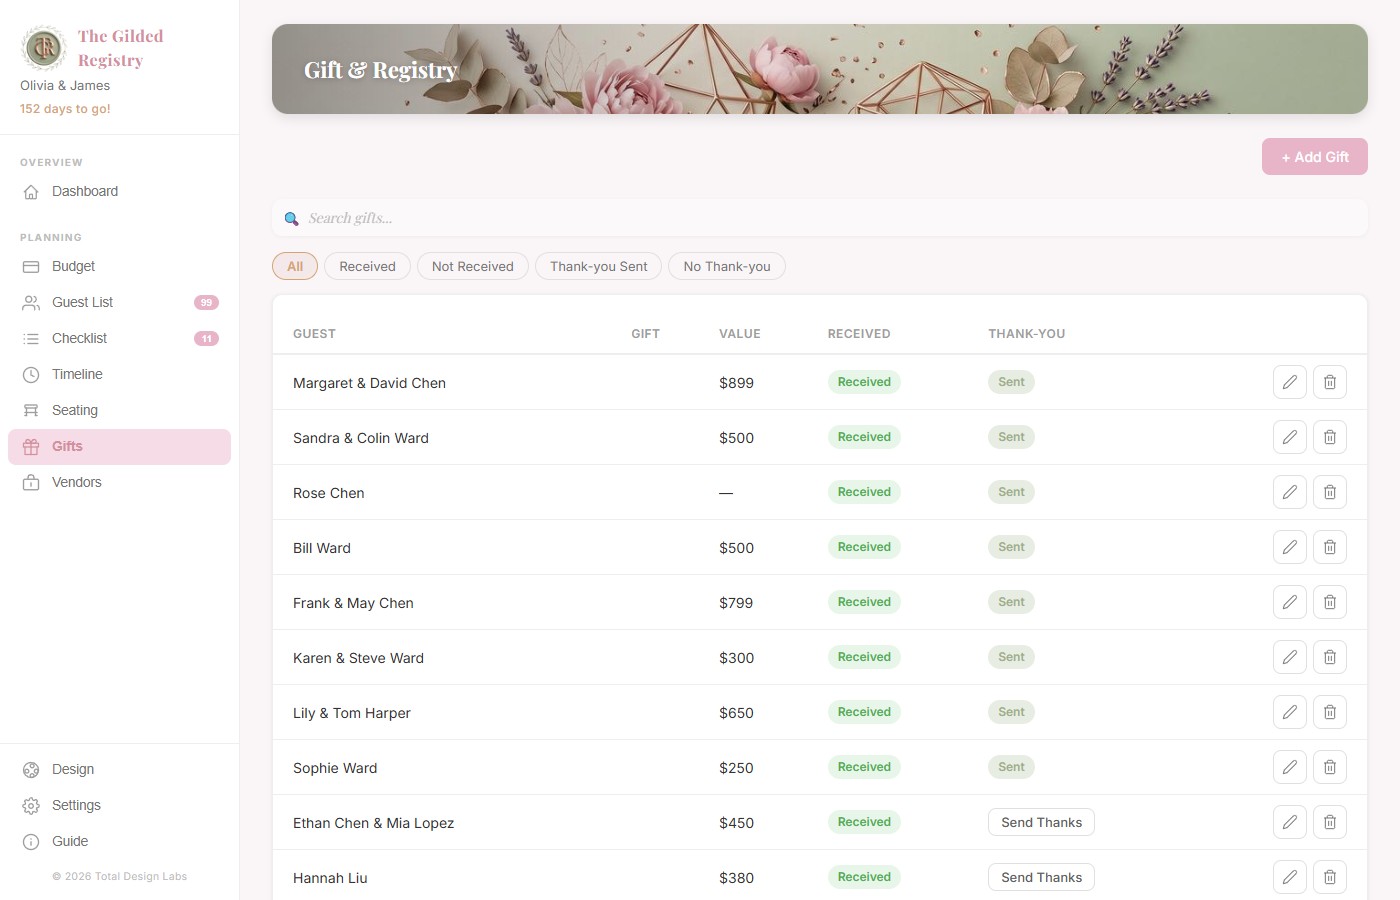
Gifts & Thank Yous
Track every gift your guests give you, whether it's a physical registry item, a wishing-well monetary contribution, or a surprise delivery. Record who gave what, the value, and whether the gift has physically arrived. Most importantly, the thank-you tracker lets you mark which guests have been sent a thank-you card so no one is accidentally forgotten after the big day.
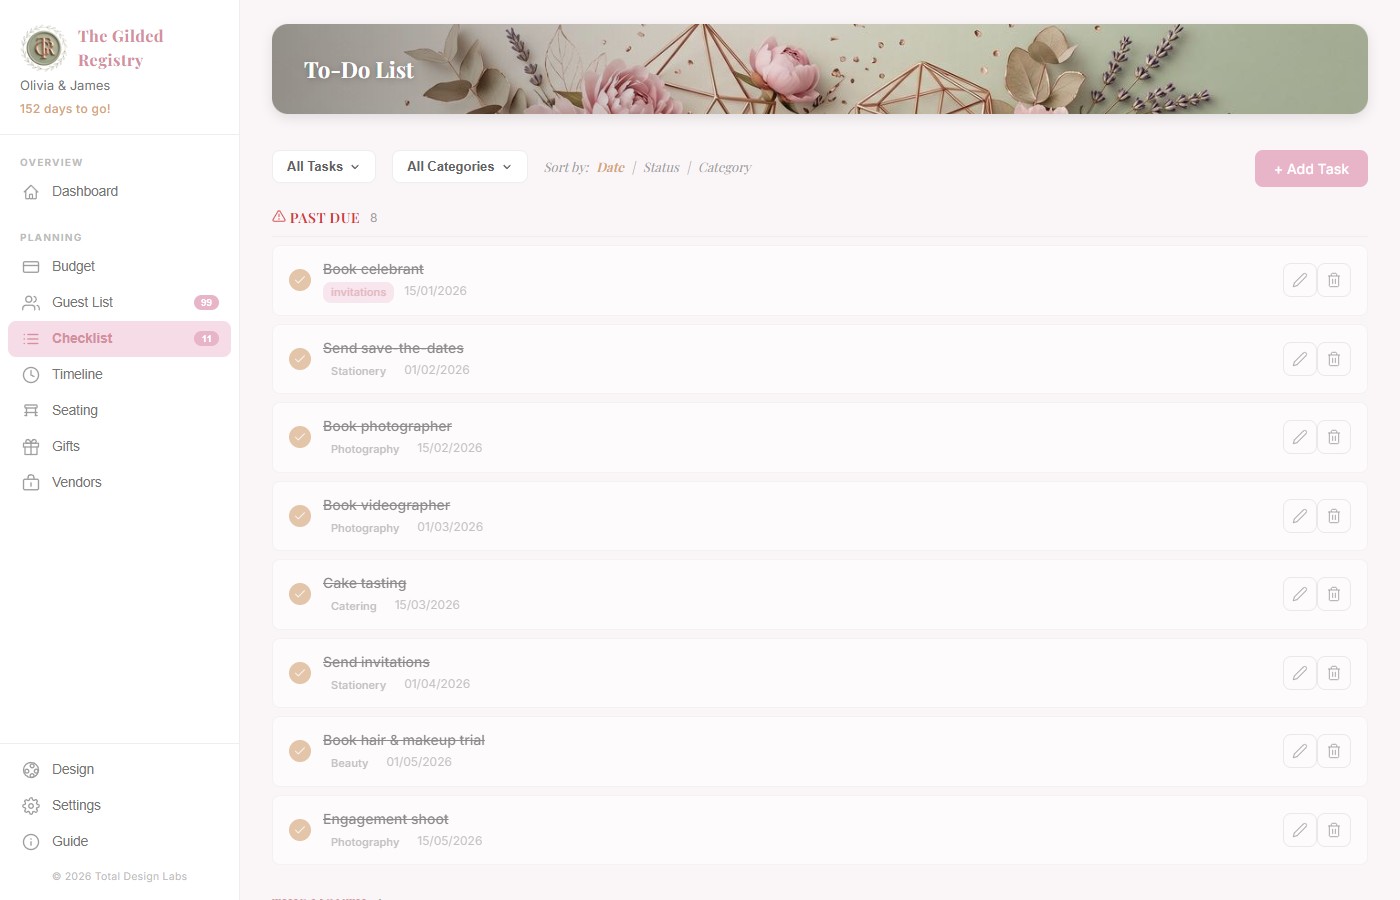
Digital Tasks & Checklist
Your wedding to-do list lives here. Add tasks with a title, category, due date, and priority level (high, medium, or low). As you complete each milestone — from booking the venue to sending save-the-dates — simply tick the checkbox to mark it done. The Dashboard shows your overall completion percentage so you can see how far along your planning is.
Guide, Design & Settings
Personalise the look and feel of your planner. Switch between light and dark mode, choose from colour schemes with three intensity levels (Minimal, Vibrant, Luxe) shown as aligned pips, and tweak the app's appearance to suit your taste. Dark mode works consistently across all colour schemes. These are purely visual preferences — they don't affect your wedding data.
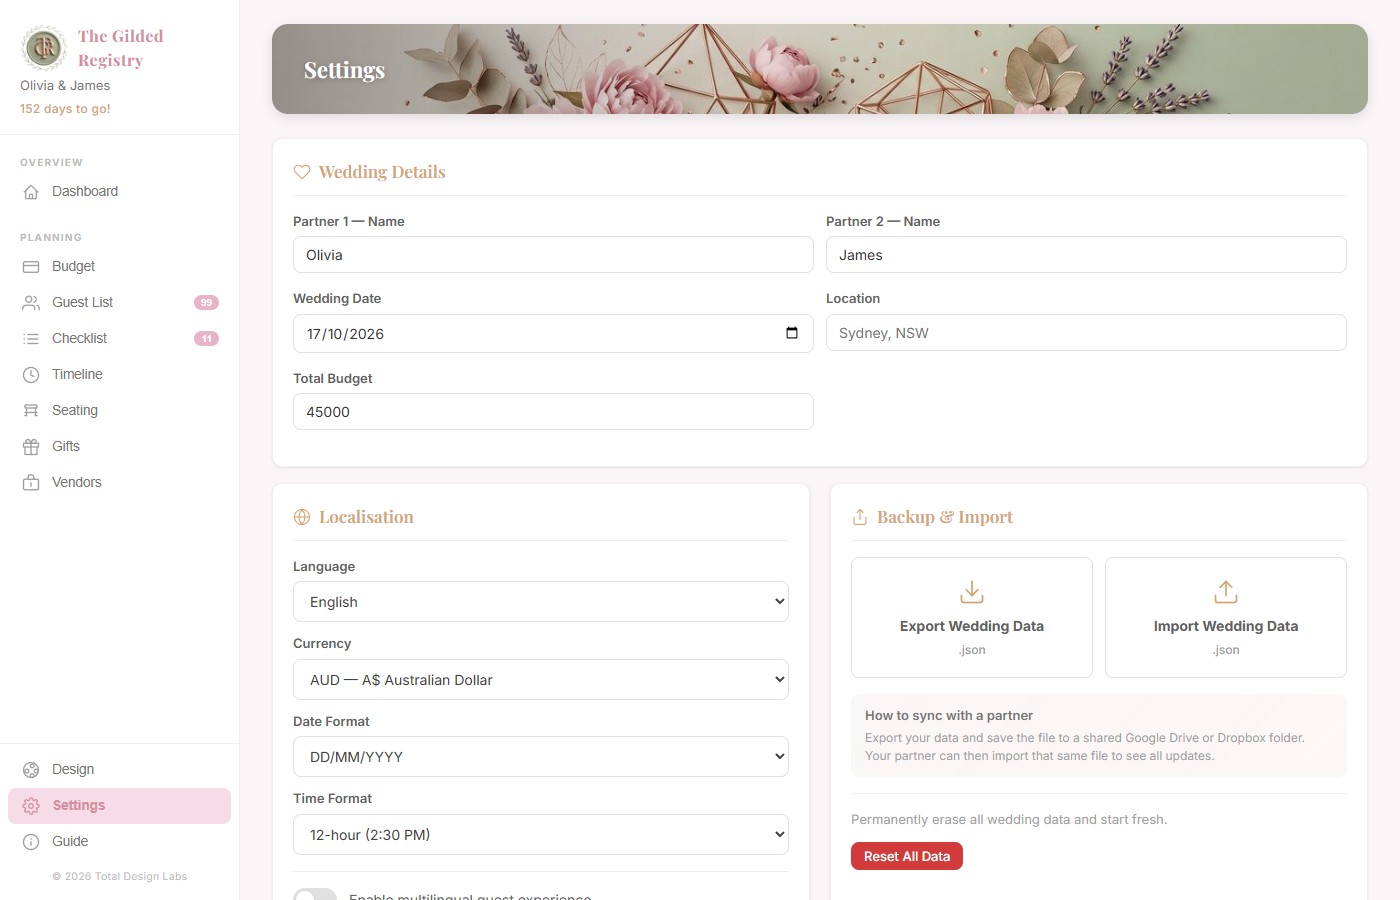
Update your names, wedding date, location, and total budget. Choose your preferred language, switch currencies (USD, GBP, EUR, AUD, and more), and override your regional date and time format (DD/MM/YYYY vs MM/DD/YYYY, 12-hour vs 24-hour). The Settings page is organised with Wedding Details at the top, followed by Localisation, then Backup & Import, and finally a Legal section at the bottom.
A built-in help page inside the app with quick tips and reminders for each planning tool. Handy if you need a refresher without switching to this document.
Mobile View
The Gilded Registry is fully mobile responsive. When you open the app on a phone or any screen 900 pixels wide or narrower, the layout automatically adapts to give you a comfortable planning experience on the go. All desktop views remain completely unchanged — the mobile adaptations only appear on smaller screens.
On mobile, each data table is streamlined to show only the most important columns. Tapping a name or title in the first column opens a read-only detail popup showing all fields for that record, along with an Edit button to make changes. On desktop, clicking names has no effect — the detail popups are a mobile-only feature.
Dashboard on Mobile
The top bar displays a hamburger menu on the left with the logo and "The Gilded Registry" centred. Your couple names appear prominently in the hero banner.
The Upcoming Tasks section shows only your first upcoming task by default, with a "Show all" toggle button that expands to reveal the rest — saving valuable vertical space. The Tips & Inspiration section displays the sparkle icon inline at the start of the quote text rather than stacked above it.
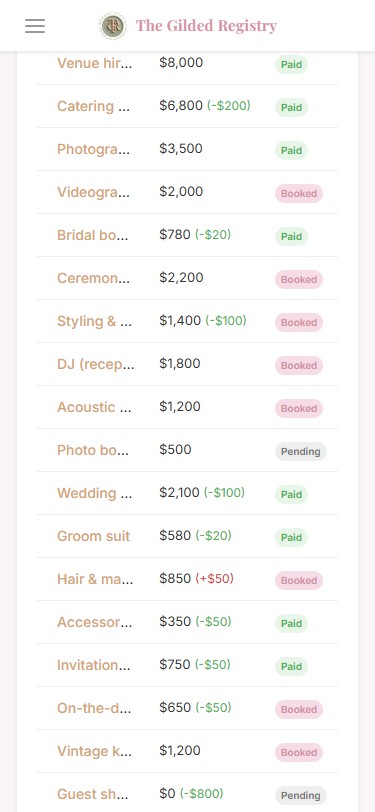
Budget Tracker (Mobile)
Shows three columns: Expense Name (tappable), Actual, and Status. The Category, Estimated, Notes, and Actions columns are hidden.
Tapping an expense name opens a detail popup displaying all fields: Category, Estimated, Actual, Status, and Notes, with an Edit button.
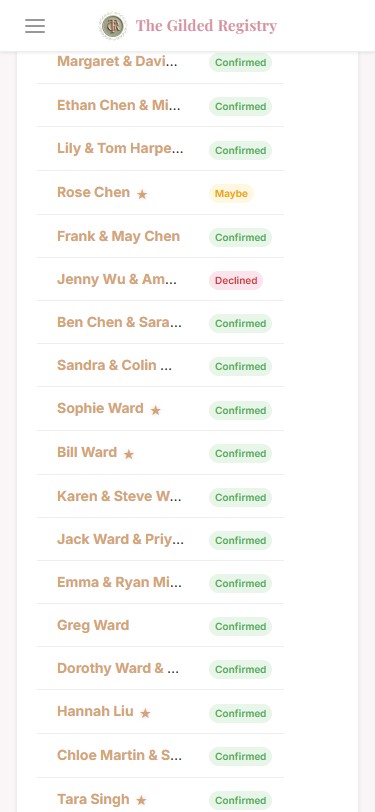
Guest Management (Mobile)
Only the Name (tappable) and RSVP columns are shown. Email, Party Size, Dietary, Seated, and Actions columns are hidden.
Tapping a guest name opens a detail popup with all guest information: RSVP status, party size, age, email, phone, dietary requirements, seating assignment, mailing address, and party members. The filter pills wrap to multiple rows so the VIP filter is always visible.

Gifts & Thank Yous (Mobile)
Shows Guest (tappable), Received (displayed as compact SVG icons — a green tick, red X, or grey question mark instead of text badges), and Thank-you columns. The Gift description, Value, and Actions columns are hidden.
Tapping a guest name opens a detail popup with the gift description, value, received status, thank-you status, and notes.
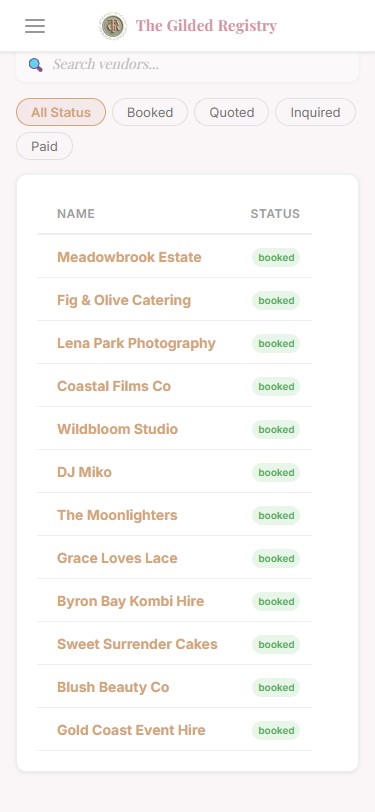
Vendor Tracker (Mobile)
Only the Name (tappable, given 70% of the row width) and Status columns are shown. The Category, Contact, Quote, Notes, and Actions columns are hidden.
Tapping a vendor name opens a detail popup displaying the category, status, quote, contact name, email, phone, and notes.
Saving Your Work
Your planning data is automatically saved inside your browser as you work. You don't need to press a "Save" button. However, this data only exists inside this one browser on this one computer. That's why saving a backup file is so important.
How to Save a Backup
- Open the app and click Settings in the sidebar menu.
- Find the Backup & Import section on the right side.
- Click Export Wedding Data. Your browser will download a small file (a .json file).
- Move that file to your wedding backup folder. We suggest naming it with the date, like: my-wedding-backup-2026-05-16.json
How to Restore from a Backup
- Go to Settings and find the Backup & Import section.
- Click Import Wedding Data and select your saved .json file.
- Choose how to import:
Merge — Adds the backup data alongside what you already have. Great for combining your partner's additions with your own.
Overwrite — Replaces everything with the backup file. Use this to restore a specific snapshot. - Confirm the import. The page will reload with your restored data.
How Often Should You Back Up?
Finished adding guests or updating the budget? Take 30 seconds to export a backup. Keep your last 3-5 backup files.
Always export after you finalise your guest list, lock your budget, or complete your seating chart.
Sharing with a Partner
Planning together? You and your partner can both use the app by sharing backup files through a cloud folder like Google Drive, Dropbox, or iCloud. Here's how it works:
- Both partners open The_Gilded_Registry.html in their own browsers (it can be on different computers).
- Set up a shared folder in Google Drive, Dropbox, iCloud, or any file-sharing service you both use.
- When one partner finishes a planning session, they export their data and upload the .json file to the shared folder.
- The other partner downloads the latest file from the shared folder and imports it to update their copy.
- Agree on who is making changes at any given time to avoid overwriting each other's work.
How the Sync Works
.json file
or iCloud
.json file
Tips for Smooth Collaboration
For each planning session, agree on who is making changes. The other partner syncs after the session ends.
Name backups like wedding-2026-05-16-emma.json so you always know who saved which version and when.
Send a quick message whenever you upload a new file to the shared folder so your partner knows to sync.
Don't delete old backup files right away. Keep at least a week's worth as a safety net in case you need to go back.
Common Questions
Click any question below to see the answer.
I opened the app on my phone and all my data is missing!
Your data lives in the browser on the device where you entered it. A different device has its own separate, empty copy of the app.
To get your data on a new device: On your main computer, go to Settings and export a backup. Transfer that .json file to your phone (via email, AirDrop, cloud drive, etc.). Then on the phone, open the app, go to Settings, and import that file.
After importing, both devices will have their own independent copies. They do not sync automatically.
Why can't my partner see the changes I just made?
The app does not have live sync between devices. Changes you make only exist on your computer until you export and share them.
To share your changes: Go to Settings, click Export, then upload the file to your shared cloud folder. Your partner needs to download that file and import it on their end.
I accidentally cleared my browser cache. Is my data gone?
If you cleared your browser data without exporting first, then unfortunately yes — that data cannot be recovered by the app.
However, if you have a recent .json backup file saved somewhere, you can import it to restore everything. This is exactly why regular backups are so important.
Going forward: Treat your backup files like an important document. Keep them in at least two places (your computer and a cloud folder).
Can I change the language, and will it affect my data?
Yes! You can change the language anytime from the Settings page. The app supports eight languages: English, German, French, Spanish, Italian, Portuguese, Indonesian, and Dutch.
Changing the language only changes the menus, buttons, and labels. All of your data — guest names, notes, budget items, everything you've typed — stays exactly as you entered it.
My seating chart looks empty even though I have guests. What happened?
The Seating page only shows guests who have been specifically assigned to tables. Having guests in your Guest List doesn't automatically put them on the seating chart.
To seat your guests: Go to the Seating page, find a table, and click "+ Seat a guest" to assign guests one by one. Only confirmed guests (RSVP = Yes) should typically be seated.
Can I plan multiple weddings with this app?
Yes! Each backup file is a complete, self-contained snapshot of a wedding. To manage multiple weddings:
- Export your current wedding data and save the .json file with a clear name.
- Go to Settings and click "Reset All Data" to start fresh.
- Begin entering data for the new wedding.
To switch back, just export the current wedding, reset, and import the other wedding's backup file.
My browser says storage is nearly full. What do I do?
This is rare — a typical wedding with up to 300 guests usually takes less than 1 MB of storage. If you see this warning, try trimming very long notes or removing any test data you no longer need.
After cleaning up, export a fresh backup file just in case.
For Advanced Users — Technical Details
This section explains how your data is stored and structured under the hood. You don't need to understand any of this to use the app — it's here for technically curious users or for troubleshooting data issues.
How Data is Stored
The app uses your browser's built-in localStorage to save all of your wedding data. When you add a guest, update a budget item, or tick off a task, the entire dataset is saved as a single entry called weddingPlanner in your browser's local storage.
Think of localStorage as a private notepad built into your browser. Unlike cookies, it never leaves your device. No data is ever sent to any server.
Data Structure Reference
All planning data lives inside a single key. Here's how each module's data is organised:
Categories (Venue, Catering, etc.) each with an allocated amount and individual expense items tracking estimates vs actuals.
- categories[ ]
- idstring
- namestring
- allocatednumber
- items[ ]
- itemNamestring
- estimatednumber
- actualnumber
- statusstring
- vendorstring
- notesstring
Each guest has party members, dietary requirements, RSVP status, and optional seating assignment.
- idstring
- namestring
- partySizenumber
- partyMembers[ ]
- dietarystring
- rsvpyes|pending|maybe|no
- age"adult" | "child"
- vipboolean (true | false)
- seatedAtstring | null (e.g. "t1")
- emailstring
- phonestring
- notesstring
Tables with shapes, capacities, and arrays of guest IDs for seat assignments.
- tables[ ]
- idstring
- namestring
- shaperound|rectangular|oval
- capacitynumber
- seatsguestId[ ]
- notesstring
- idstring
- titlestring
- categorystring
- dueDateISO date
- completedboolean (true | false)
- priorityhigh|medium|low
true, the task appears ticked off and contributes to the Dashboard completion percentage.- idstring
- giftNamestring
- giverstring
- receivedboolean
- thankYouSentboolean
- valuenumber
- notesstring
Each vendor record tracks a booked professional with contact info, financial details, and booking status.
- idstring
- namestring
- categorystring
- contactstring
- emailstring
- phonestring
- quotenumber
- depositnumber
- balancenumber
- statussearching | booked
- notesstring
Ordered events for the wedding day run sheet with specific times and descriptions.
- idstring
- timeHH:MM (24h) or h:MM AM/PM
- titlestring
- descriptionstring
- categorystring